


")


How to build an AOSP ROM for Android devices?

Introduction
This time, the topic I will talk about is “How to Build a Pure Android OS for Your Android Device from AOSP (Android Open Source Project) SourceCode?” Once you know this method, you will be able to build other AOSP based ROMs as well as LineageOS based ROMs.
The only place where the build process breaks is where you need to get the Android SourceCode. One thing to be aware of is that the Android SourceCode files are over 20GB in size. Therefore, you will need a good internet connection to run this.
You can build on both Linux and Mac. I’m a Linux user (currently using Ubuntu 17.04) so I’ll build on Ubuntu for example. The target Android device I’m building on is the Nexus 5X.
Requirements
- You must have a computer running Linux OS.
- OpenJDK must be installed.
- You must have Python 2.7+ installed ( Google’s git-repo is written in Python, so git-repo will not work if you don’t have Python installed )
- Must be able to use Git
- You can also use Google’s git-repo. You can learn about git-repo here . Once you’re done, learn about git-repo commands here .
git-repo
git-repo is a tool developed by Google based on Git. It is very useful for Android ROM development. It is called [ git-repo – Multiple Repository Tool ] .
Its usefulness is that once you have created a repo, you can create a .xml file in it, link to as many repos as you want to remote, and use the repo sync command to download multiple repositories to your local machine in one place.
The idea is that instead of git cloning one by one out of the many Android SourceCode Repositories required to build a ROM, you can gather many Repositories from a .xml file and download them locally.
Step 1: OpenJDK Installation
- First, you need to install OpenJDK on your computer. Open a terminal and type the following commands.
sudo apt-get update
sudo apt-get install openjdk-8-jdk
sudo apt-get install openjdk-8-jreWhen installing OpenJDK, you need to be aware that “the OpenJDK version you install will differ depending on the Android version you build.”
- From Android Nougat to Android Oreo, install OpenJDK 8.
- If you are using Android Lollipop or Android Marshmallow, install OpenJDK 7.
- From Android Gingerbread to Android KitKat, install OpenJDK 6.
- For Android versions below Android Gingerbread, no one is building it, so I won’t say anything.
Step 2: Python Installation
- The next step is to install Python. Python 2.7 is sufficient.
Python 3 and above are not very compatible with git-repo. Therefore, install Python 2.7 only.
sudo add-apt-repository ppa:fkrull/deadsnakes
sudo apt-get update
sudo apt-get install python2.7
Step 3: Build-Tools Installation
- To install the required build-tools, type the following command in Terminal.
sudo apt-get install git-core gnupg flex bison gperf build-essential zip curl zlib1g-dev gcc-multilib g++-multilib libc6-dev-i386 lib32ncurses5-dev x11proto-core-dev libx11-dev lib32z-dev ccache libgl1-mesa-dev libxml2-utils xsltproc unzip
Step 4: Git and Repo (git-repo) Installation
- First, install Git if you haven’t already. (If you already have it installed, you can skip this step.)
sudo apt-get install git-core
- Enter your Username and Email Address for Git.
git config –global user.name “Your Name”
git config –global user.email “[email protected]” - You need to install Google’s git-repo.
mkdir ~/bin
PATH=~/bin:$PATH
curl https://storage.googleapis.com/git-repo-downloads/repo > ~/bin/repo
chmod a+x ~/bin/repo - Once you have completed all of these steps, the Setup Environment for building a ROM is complete.
Downloading the Sources
- Before downloading sources, I would like to first talk about the essential requirements for building a CustomROM.
- The Android Platform Manifest, which contains the frameworks, libraries, system apps packages, device trees, kernel trees, build-tools, tools, GCC compilers, and other repositories required for the entire Android OS, has a file size of 20GB or more.
- For other Android devices, not just Google’s Nexus and Pixel devices, you’ll need to find the Device Tree and Kernel Source. The Device Trees for Google’s devices are already in the AOSP Repo. (For beginners, it’s best to look under LineageOS , which is the largest ROM community . I’ll explain how to generate a Device Tree based on your phone’s hardware arch later.)
- Then you need Proprietary Vendor Files for Android devices. In other words, these files are non-opensource files. They are extracted from your phone’s firmware. For example, visit this Repo .
- The first thing we need to do is create a directory to download the sources.
mkdir AOSP-ROM-Project
cd AOSP-ROM-Project
- I am going to download Android SourceCode. If you download from Google Git AOSP Repo, the file size is very large, so I would recommend that you download from my personal AOSP Repo that I built on GitHub. Because I have reduced unnecessary project paths in my GitHub AOSP Repo. Of course. Download from your favorite Repo.
- First you need to know where the AOSP SourceCode is located. Go here .
- The last character -b is the branch you want to build from. In other words, the version of Android you want to build from, and the r (r_23) stands for Release.
- The commands used here are git-repo commands. The repository we will use is a repository specifically written for git-repo. It is written in xml. The writing method is simple. Learn here .
repo init -u https://android.googlesource.com/platform/manifest -b android-8.0.0_r23
(OR)
repo init -u https://github.com/zawzaww/aosp-android -b oreo
- I will add that you can also download the source code of any other CustomROM. (I will use the well-known LineageOS as an example)
- The last character -b is the Branch Name. lineage-15.0 is for Oreo Build. If you use cm-14.1/cm-14.0, it is for Nougat build. You can build any Android version you like.
repo init -u git://github.com/LineageOS/android.git -b lineage-15.0
- To download the sources, type the command below.
repo sync
- After that, it’s time to download the sources. The process of downloading the source code will depend on your internet connection.
Building AOSP from Sources
- First, I will tell you what you need to prepare before compiling from source.
- The first thing you need is your phone’s Device Tree.
- Where to add the location is under /device under the downloaded Source dir.
- Format:
/device/manufacturer/device_name
- Example for Nexus 5X:
/device/lge/bullhead

- There are two ways to build a ROM: building the kernel from the kernel source, or building a ROM from a prebuilt kernel. I recommend building from the kernel source.
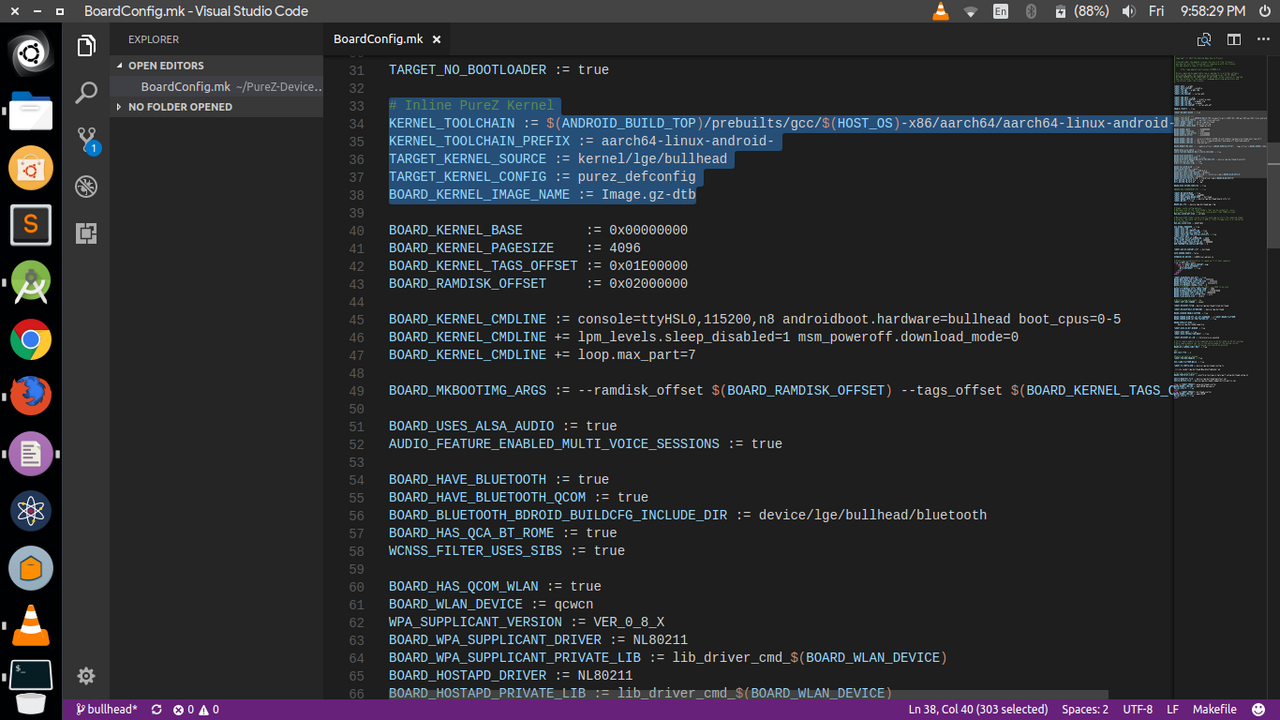
- Also, if you build from Kernel Source, there is a need to edit the Device Tree. For example, for the Nexus 5X, open /device/lge/bullhead/BoardConfig.mk with a TextEditor and add the following code.
# Inline PureZ Kernel Build
KERNEL_TOOLCHAIN := $(ANDROID_BUILD_TOP)/prebuilts/gcc/$(HOST_OS)-x86/aarch64/aarch64-linux-android-4.9/bin
KERNEL_TOOLCHAIN_PREFIX := aarch64-linux-android-
TARGET_KERNEL_SOURCE := kernel/lge/bullhead
TARGET_KERNEL_CONFIG := purez_defconfig
BOARD_KERNEL_IMAGE_NAME := Image.gz-dtb - Explanation:
This step will be easy after reading the tutorial I wrote first .
Line 1 – Provides the toolchain location where the kernel will be compiled.
Line 2 – This is called the Kernel Toolchain Prefix of the toolchain you will use. (If you don’t understand, please read the Kernel Compilation Tutorial)
Line 3 – This is the Kernel Source Location that I will build.
Line 4 – Kernel Configuration is used to build the kernel. This code is part of the Kernel config.
Line 5 – You must write the exact Kernel Image Name that will be output for your phone.
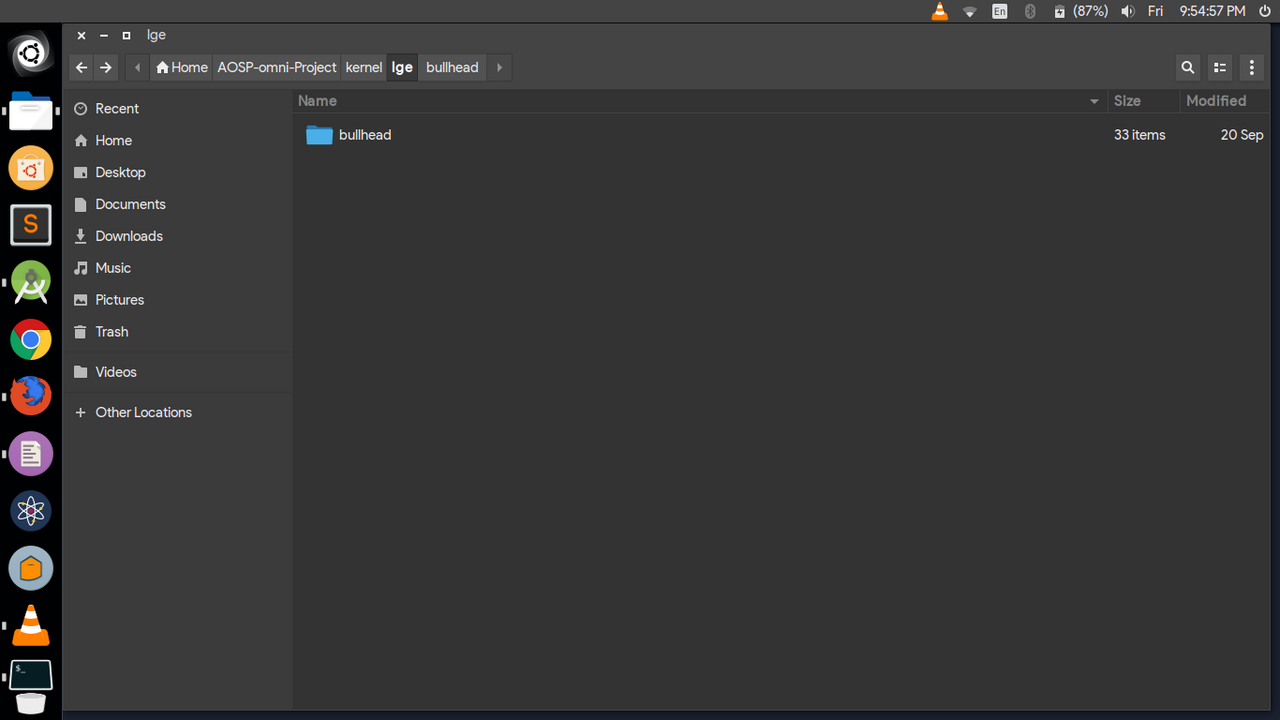
- The next step is the Kernel Source section. The location to add it is under /kernel under the Source dir.
- Format:
/kernel/manufacturer/device_name
- Example: for Nexus 5X (This location should return the Kernel Source Path in the Device Tree)
/kernel/lge/bullhead
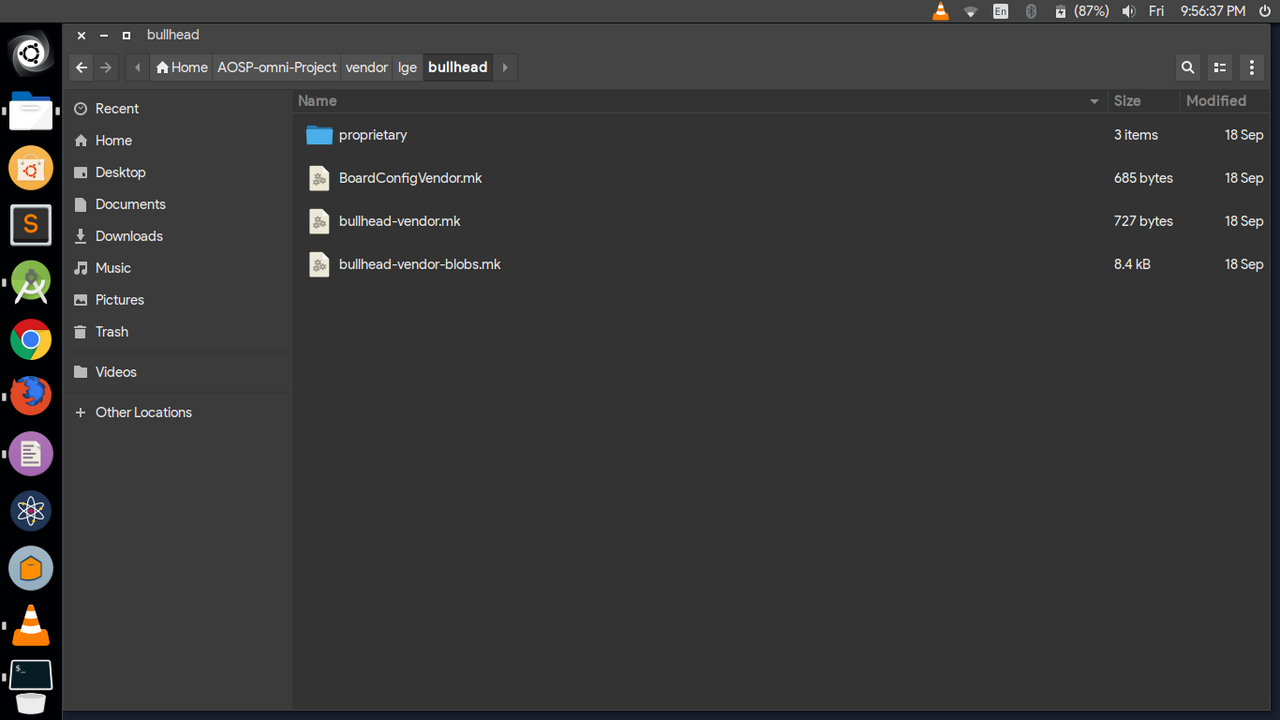
- The vendor section. This one should be added under /vendor under the Source dir.
- Format:
/vendor/manufacturer/device_name
- Example: for Nexus 5X
/vendor/lge/bullhead
- Once these are complete, you are ready to build an AOSP ROM.
Final Steps
- This is the final step. Go to the downloaded Source Dir and open Terminal. Type the following command.
. build/envsetup.sh
- Once done, you need to launch the device you are building.
- Format:
lunch <device_name>
(OR)
lunch
- Example: for Nexus 5X
lunch aosp_bullhead-userdebug
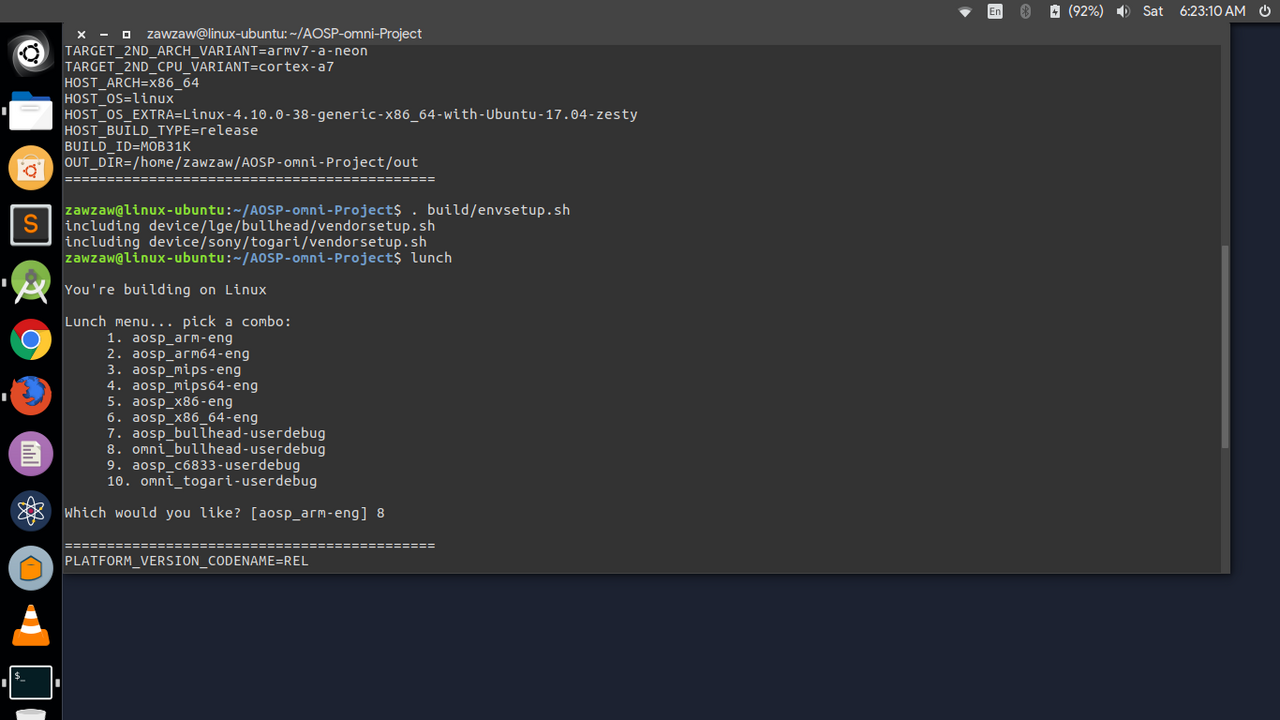
- The best thing to do is type lunch and when the device names you want to build appear, continue typing the device number you want to build.
lunch
Enter 1 or 2 or 3 etc…
- Then type the command below to build.
make -j4
(OR)
make -j$(nproc –all)
- The output will be under /out/target/product/bullhead/.
- Then the compilation process will begin. The process time will depend on your computer’s CPU.
I will add the build command for other AOSP Based or LineageOS Based ROMs. The above mentioned are built from pure AOSP source. The commands used are slightly different from other ROM Teams.
- The first command is the same.
. build/envsetup.sh
- Then type the command below.
- Format:
breakfast <device_name>
- Example: for Nexus 5X (bullhead)
breakfast bullhead
- To build, type the command below.
how much bacon
- The output will be a flashablezip under /out/target/product/bullhead/.
- As mentioned above, the compilation process time will depend on the computer’s CPU.


Post Comment